
spotmarket Graph Sample
Posted: 2016-06-07 Filed under: nullsec, pvp, python, spotmarket | Tags: amarr, branch, deklein, dodixie, fade, guristas, jita, pure blind, rens, tenal, the forge, tribute, venal Leave a commentWhat’s data without some graphs? Here is a small snip of the graphing that is currently in the spotmarket project.
Data
Jumps
2016-01-13 to 2016-06-07
17,802,640 Rows
Kill
2016-01-13 to 2016-06-07
9,819,421 Rows
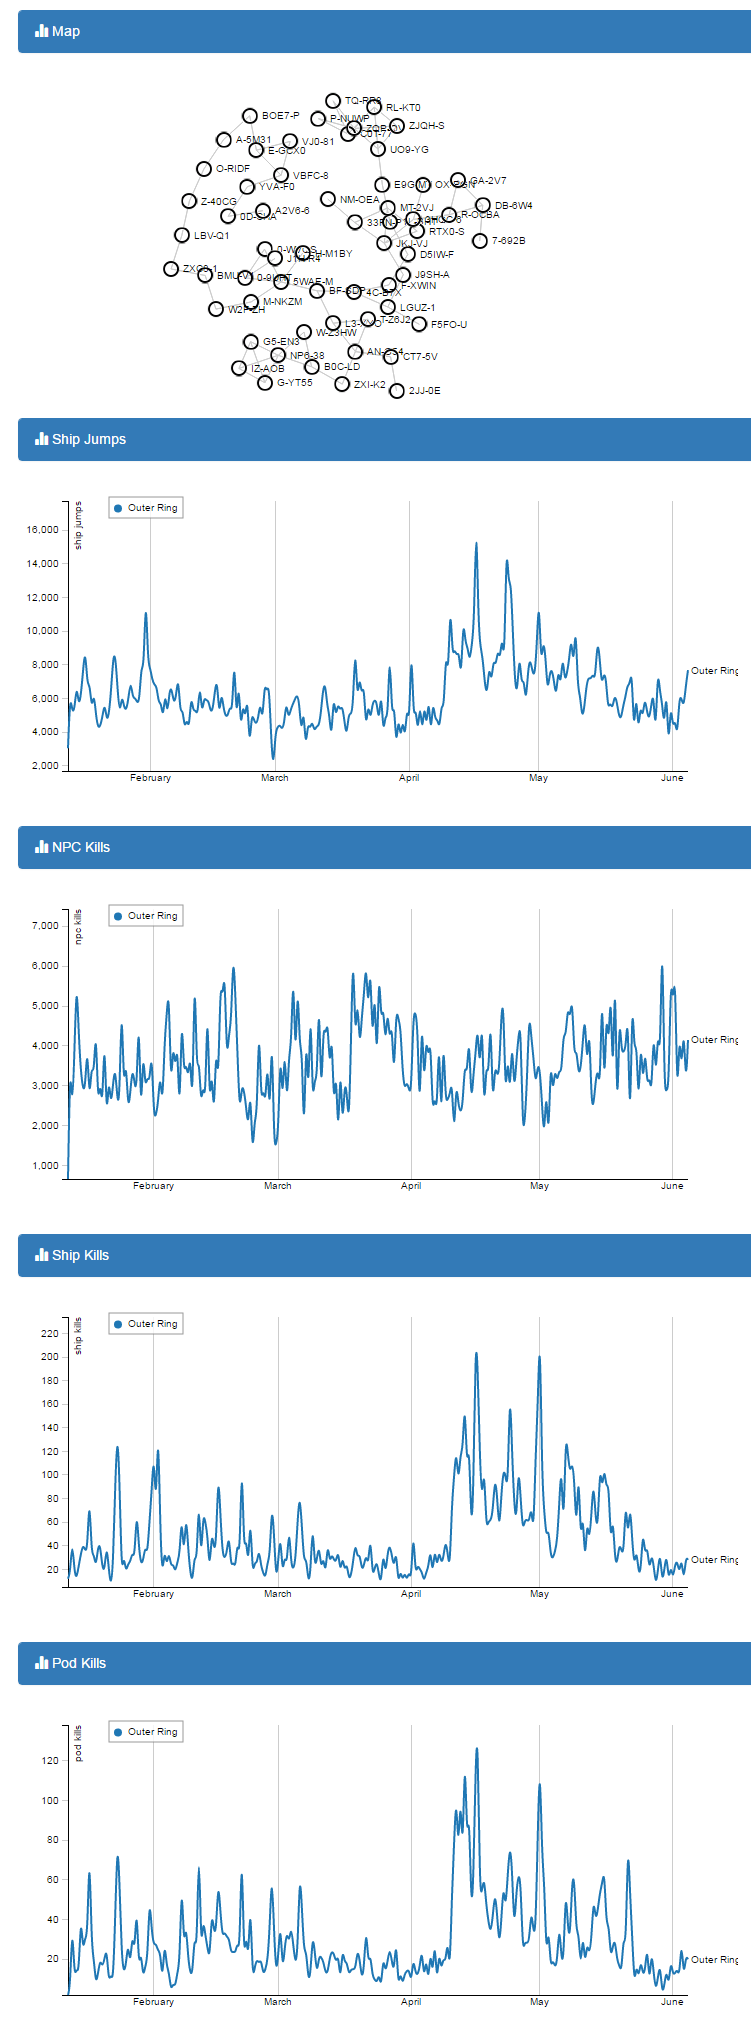
Graphs
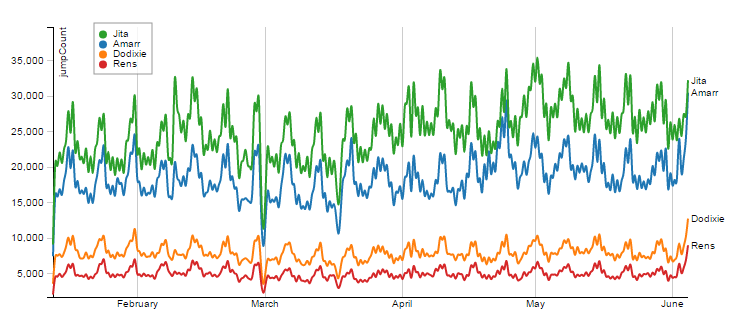
Jumps in Trade Hubs
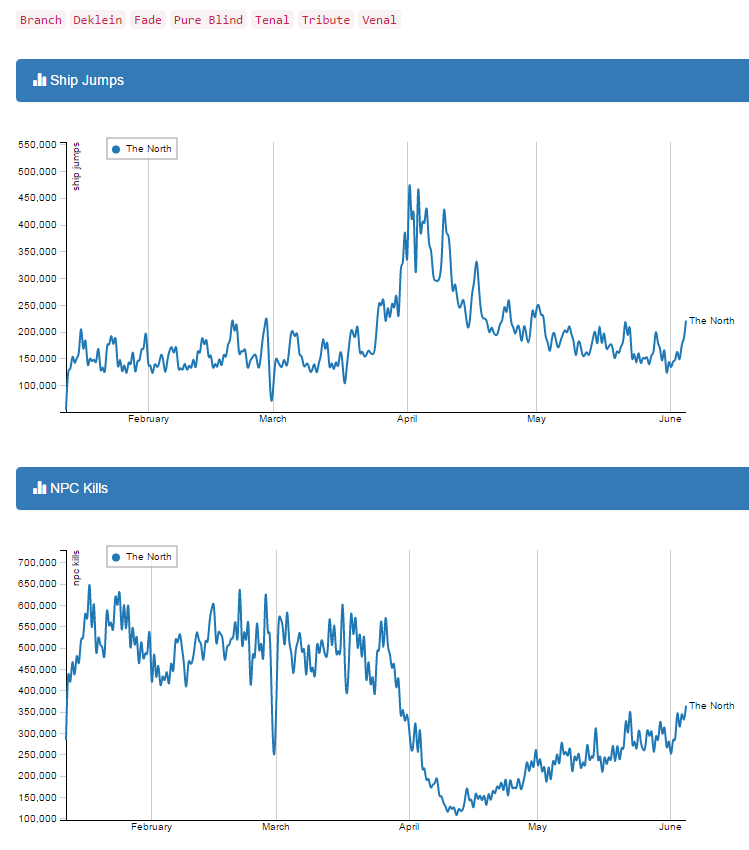
Jumps and NPC Activity in The Northern Regions
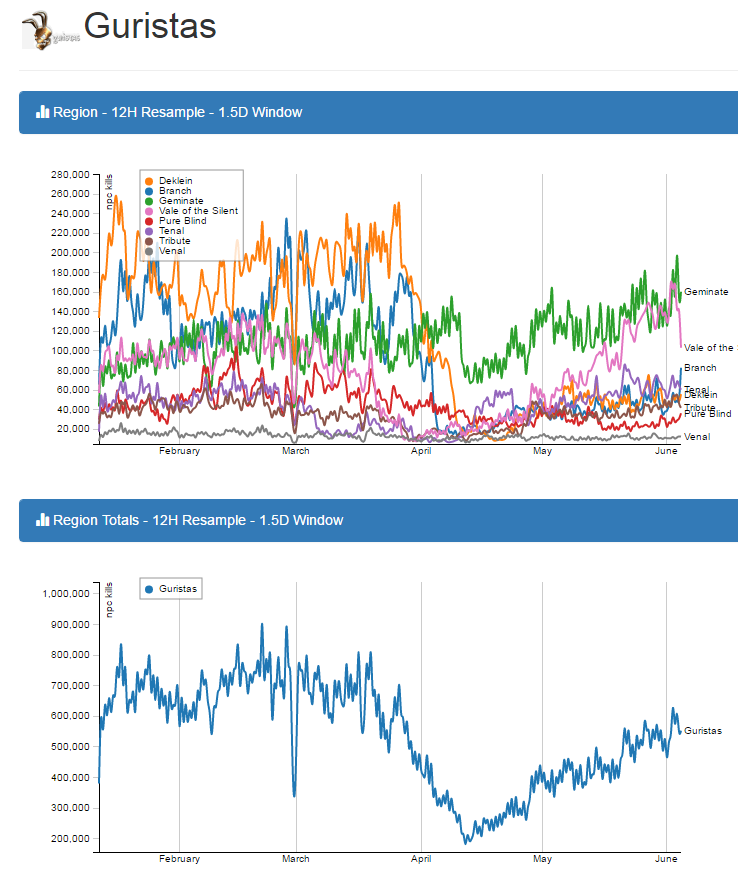
Gurista Ratting Rates
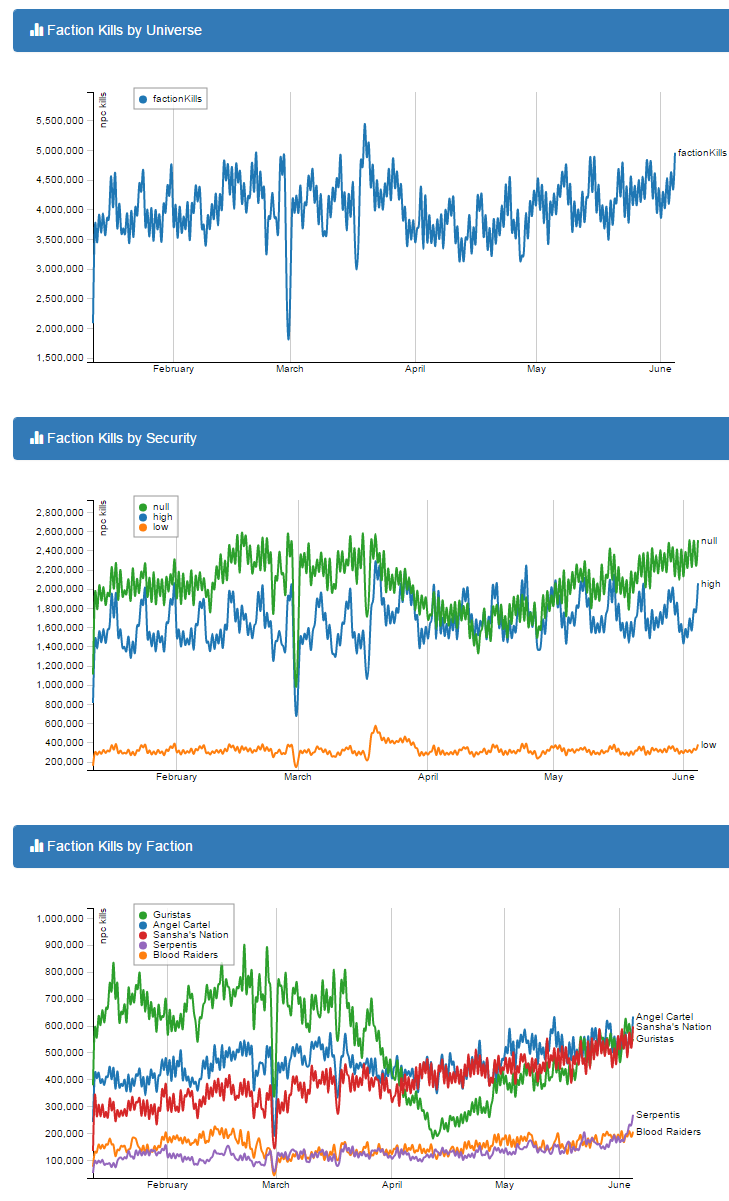
NPC Universe Overview
Outer Ring
First pass at a map using D3.js inspired by HelicityBoson at http://www.machine9.net/?p=1111.
3 Months of Manufacturing Index Changes for Deklein
Posted: 2014-10-28 Filed under: industry, nullsec | Tags: deklein, VFK-IV Leave a commentI’ve started to accumulate a decent amount of daily index data and have started to use it to look at larger trends. Here’s a snapshot of Deklein region over the past 97 days.

Nullsec Trade Hub Profiteering
Posted: 2013-02-23 Filed under: eveonline, history, industry, market, nullsec, ships | Tags: anshar, ark, cloud ring, D2-HOS, deklein, G8AD-C, jita, K-6K16, niarja, nomad, pure blind, rhea, uedama, VFK-IV 7 CommentsOverview
The best way that I have found to make money for the lest amount of effort is stocking nullsec hubs. Forget mining, mission running, invention, or any type of item or ship production. If you spend time doing market research, planing your logistics, reducing your risk, and monitor sales you can make far much more than any other type of activity in Eve.
What follows is a guide for stating up your own operation to stock the warchests of eager PVP pilots (at a profit of course).
I’m using three years of trade and logistics experience to help me outline the operation. Your style may differ, but here is the outlay that has worked for me time and time again despite political change.
If you can parse information in the form of Dotlan map statistics, notice price disparity between two locations, have a basic understanding of jump mechanics, learn to avoid common ganking techniques, and maintain a basic level of proficiency in Nullsec politics you can easily break into this style of gameplay.
tl;dr
Buy low in Jita, move things to nullsec, and sell for a profit. To grow bigger take the profits generated and reinvest in your operation to increase its product scope and logistical power.
Disclaimer
In order to properly reach several places and reduce the amount of midpoint jumps, you will need Jump Drive Calibration V. If you don’t have this yet, go train it as it is one of the most valuable skills for jump capable pilots.
A trade alt should have polished skills to reduce taxes and increase capacity, Accounting and Broker Relations to V and then work on increasing the number by getting Tycoon IV.
Start-up capital may vary. I started my operation with 2 B ISK and have grown from there so tailor the scope of the operation to your level.
Objectives
- Always look to reduce risk. This extends from not putting too much ISK into the operation in case it fails, not getting a hauling ship ganked, keeping assets under your control, or even not telling people about your timetable and route for logistics.
- Because time is money you want to reduce time sinks. The end goal for this operation is to spend as little time as possible managing it and more time doing other activities. For me that meant more market research and blogging, but for the majority of people I imagine funding endless PVP activity is the goal.
- Improve sales by using a program to produce reporting and business intelligence out of your data. EVE HQ, Eve Mentat, or EMMA are all good solutions, but I spent a lot of time flexing my PHP muscle to build my own wallet manager. Goonswarm has built their own import tool called Goonmetrics for people that lack the technical expertise of setting up databases and operating code.
Station Selection
Finding a suitable hub depends on many factors including traffic, location, and the ease of logistics getting into the destination system.
- To maximize your ISK velocity, find a place with a lot of traffic. Use the filters on Dotlan and the in-game map to discover numbers for the number of pilots docked and jumps per 24 hours. Major nullsec hubs will standout on the filter with thousands of jumps per day.
- Find an Alliance and location that is politically stable. When assets are moved into a conquerable station, you run the risk of loosing access to that station. If this happens, you will need to keep your trade alt docked and either slowly sell off your items or firesale them to quickly liquidate. Do keep in mind that without notice major shift in power can occur; look up the history of Band of Brothers or GoonSwarm to discover how powerful the click of a mouse button can be.
- Consider the logistical hurdles to getting to the destination station. More midpoints means more time spent doing logistics and the lack of midpoint stations can mean the use of alternative jumping methods as outlined in the Jump Technique #2 section.
- Check cynojammer status for your destination and midpoint systems. Some alliances will jam their system to reduce the likely hood of enemy capitals entering. Others alliances won’t care and have found joy in the opportunity of a large-scale capital engagement in their home system (ie Titan battle of August 15 in K-6K16).
- Alliances have many CTAs so get on Jabber, look at forum posts, or talk to PVP people about where they are staging. You want to stock where things are blowing up. Note: stocking a staging station for a campaign is very risky and I would not recommend this type of stocking for people that lack heavy logistics to move goods out at a moments notice due to the sometimes fickle nature of alliance leadership decisions and campaign politics.
Hub Ranking
Using a number of tools, you can find and target the best Nullsec trade hub. Element43 has a market filter that displays active orders per station.
If you have basic knowledge of Nullsec politics, the following systems will standout immediately: VFK-IV, K-8SQS, K-6K16, HIX4-H, and 6VDT-H. These are home systems for many of the major alliances.
Character Placement
The more cyno alts the better. Moving characters around will cost time and slow you down. In my operation I have 5 cyno capable alts around the galaxy that shift depend on where I am currently operating.
A trade alt will remain pertinently docked in the Nullsec destination system and only exit station to light the occasional cyno.
I have a character in Jita that holds ISK and does all of the purchasing. This helps isolate all the purchases to one character to keep my bookkeeping tidy.
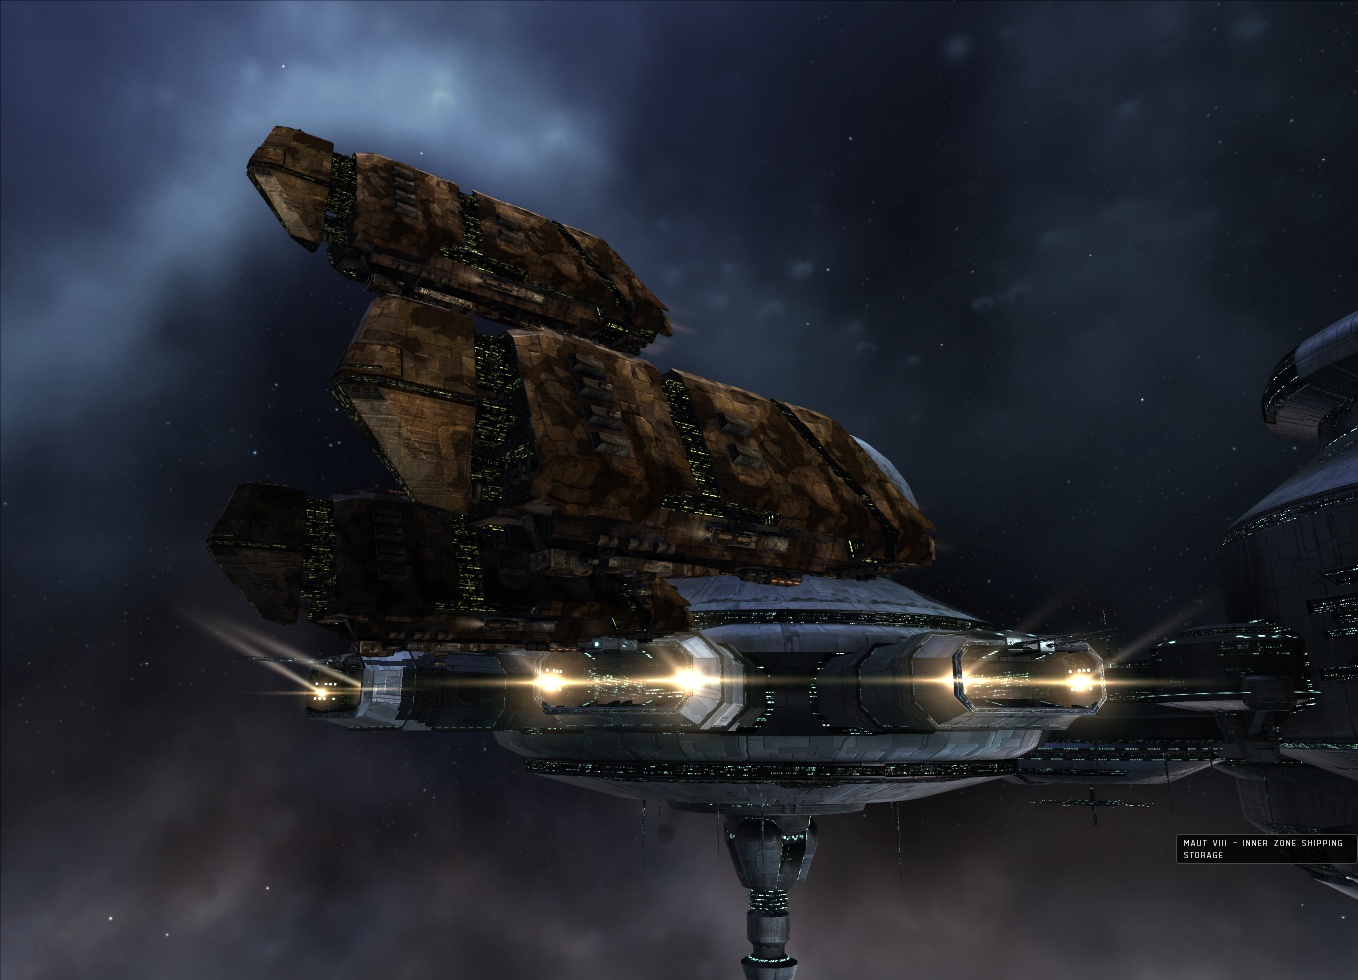
Logistics Overview
The goal of the operation is to move items from a Highsec trade hub, to a Highsec station system next to a Lowsec station system, and then into Nullsec by means of either zero or many midpoints.

This illustration shows two legs on the operation. The Highsec and Lowsec activity can be handled by a NPC character while the Midpoint and Nullsec end is dedicated to your Alliance character.
I use Jump Freighters in this example, but based on your capital the number and types of ships, each setup will vary. When I started my operation I used standard Industrial ships to get around Highsec, a Blockade Runner to get into Lowsec, and a Carrier to perform the cyno operations into the destination system.
Logistics Stage 1: Product Selection
There are many ways to find profitable items and I’ve already published some of the things that are very volatile in nullsec in this post.
Logistics Stage 2: Getting out of Jita
A proper Jita insta-undock bookmark is a valuable things. Using this will reduce a large amount of your risk as it will place you off of the Jita undock grid within seconds.
Logistics Stage 3: Getting Across Highsec
There are many options for transporting across Highsec that include doing it yourself or outsourcing with services such as Red Frog Freight. The volume, time, available capital, and risk will dictate what method to use.
If you are just beginning your operation, you will have to be frugal and move items with a Industrial. Later you can move on to Blockade Runners (Crane, Prorator, Viator or Prowler) since their cargo area is unscannable as of the Retribution patch.
Though scannable, an Orca has a large tank and can be used to transport larger amounts of goods than Blockade Runners. Freighters do have a large amount of capacity, but they are often targets for ganking activity. If money is no object, choose to use a NPC Jump Freighter to move items as they offer a larger amount of HPs and align faster than normal Freighters.
Logistics Stage 4: Getting from Highsec to Lowsec
This move can be done with standard Industrials, Blockade Runners, Orcas, Freighters or Jump Freighters. The riskier methods involve scouting the gate on the Lowsec end and moving goods only when clear.
The fastest m3 per time method is to have your goods staged in Highsec in the adjacent system, light a cyno on the Lowsec station, jump to Lowsec, dock, unload, undock, align to the Highsec gate, and enter warp when you reach velocity returning to the Highsec system to begin the cycle again.
Note that I stated to align and not Warp To as a method for killing Jump Freighters is to bump or web reducing the maximum speed below the current speed, effectively locking you in the Warp operation. Read up on the ‘Vindicator Triple Web’ exploit if want to know more about this exploit. If you don’t issue the Warp To command and are aligning, at any sign of trouble you can dock.
Logistics Stage 5: Getting Across Lowsec
Use the Station to Station technique outlined later.
Logistics Stage 6: Getting Across Nullsec
Use the Station to Station technique outlined later.
Logistics Stage 7: Destination System
Getting into the destination system is the last leg in the journey and the technique used will depend on the Alliance’s use of a Cynosural System Jammer or Cynosural Generator Array POS module.
The D2-HOS system in Pure Blind was FA’s capital system and jammed. The best route in was jumping into a adjacent system and scouting the gate. Higher risk, but at the time it was worth it.
Before Widly Innapropirate were absorbed into GoonSwarm, they homed in G8AD in Cloud Ring. They had an active beacon. If you scouted the system and had Carrier backup, your risk was reduced.
The best method is to find a major Nullsec hub that lacks a jammer so your trade alt can undock, light a cyno within docking range, and let your ship land right within docking range. This technique reduces your risk to almost nothing if done properly.
Jump Technique 1: Station to Station Jumps
The most efficient, low risk method of moving items between Lowsec <-> Lowsec, Lowsec <-> Nullsec, or Nullsec <-> Nullsec system is to have two characters in two systems light cynos within docking range of each respective station.
The Jump Freighter will jump in, dock, unload, undock, and jump back to the original cyno. If you are quick, you can get 5-6 jump cycles under one cyno timer. Done efficiently this method can move around 1,750,000 m3 per cyno depending on your Freighter skill level and racial Jump Freighter, both which affect the ship’s cargo capacity.
Jump Technique 2: POS Container Jumping
If you absolutely cannot get a station system as one of your midpoints, you can use a riskier method using an anchored container and a POS with a Cynosural Generator Array module. The goal with this method is to jump in and warp to 100 km to the anchored container, landing you inside the POS shields.

If done correctly, you will only be vulnerable for a few seconds as your ship aligns and warps withing the POS shields. I do, however, recommend that you only jump into the system when it is empty with a character in the system to monitor activity. There is still a chance of an enemy logging off next to the Cynosural Generator Array and logging back in as they see you leave the originating system, but it is low.
When I would perform this type of operation I had a Carrier on standby within jump range of the POS system. If anything went not according to plan, the Carrier came into system to serve as support while the POS guns fended off the attacker or Alliance reinforcements arrived.
Jump Technique 3: Right Out of Jita
A quick, lowrisk method for moving billions out of Jita involves bypassing Highsec altogether as a large number of systems are jump accessible right out of the Jita undock as seen here.
Using this technique, you can put a large amount of ISK into your NPC Jump Freighter and bypass the deadly gank systems of Uedama and Niarja.
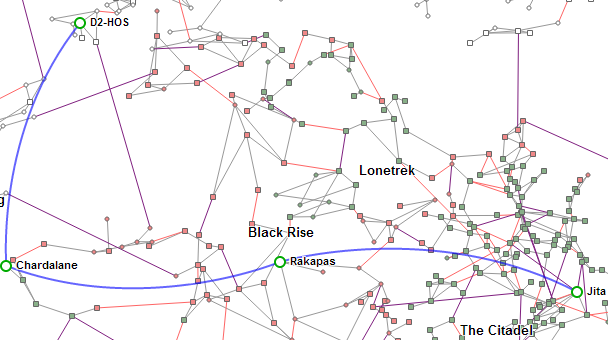
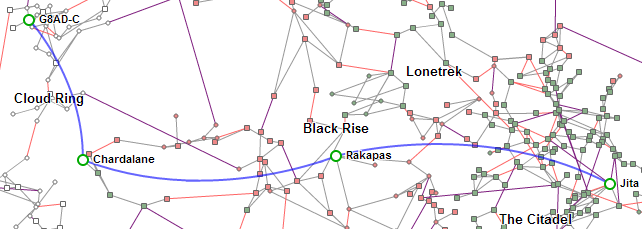
Concrete Examples
Here are two route examples of when I would stock for the former Northern Coalition. The three Lowsec systems of Chardalane, Maut, and Oulley served as three options for extending myself into Nullsec as they were each Lowsec station systems with a connection to contiguous Highsec. If either system was busy with cyno popping pirates, I would switch to one of the other two options.
Operation Details
- Buy things in Jita and place 5-10 B in a Courier Wrapped Freighter Container on my Jita purchasing character.
- Undock with a NPC freighter character and move to Adacyne, the Highsec system next to Chardalane.
- Use a NPC Jump Freighter to move goods from Adacyne into Chardalane Lowsec.
- Use a Alliance Jump Freighter to jump into D2-HOS or G8AD-C.
- Hand off goods to my Trade alt in the station and price items for sale.


Route for D2-HOS in Pure Blind for Fidelas Constans before they moved to Branch.
Here is the route for G8AD-C in Cloud Ring for Wildly Inappropriate before they were absorbed into Goonswarm Federation.
Results
If you look back at any of my monthly reports, you can review the success of my efforts. My recommendations for people that want to get involved with Nullsec trade and production is to always keep one eye on Nullsec politics. Take notice of who is attacking, defending, advancing, and maintaining homogeneity; the key to your success is situational awareness.
Minerals to Alpha Fleet Maelstrom
Posted: 2012-08-29 Filed under: industry, market, nullsec, pos | Tags: cloud ring, deklein, freighter, isogen, jita, jump freighter, maelstrom, megacyte, mexallon, nocxium, pure blind, pyerite, tritanium, zydrine 6 Commentstl;dr Using mineral compression enables you to haul the minerals needed to built 344 battleships in one Jump Freighter.
Heavy Industry
When I started playing, I knew that I wanted to be a builder; I wanted to become an industrial gear in the alliance war machine providing materials to advance the cause.
At the height of the Northern Collation, the Alpha Maelstrom was king. The ability to deliver bursts of coordinated damage in high lag situations was the method to win battles.
Over the life of the Northern Collation, I built and sold around 344 Maelstrom ships in Cloud Ring, Pure Blind, and Deklein.
You might assume that these were hauled in from Empire or built from nullsec minerals, but that is not the best way to operate. I’ve wrote about mineral compression before, but now I wanted to disclose my building operations with a concrete example now that my Maelstrom production line has been retired.
Side note: TEST officially announced the end of Maelstrom reimbursements yesterday. RIP bucket of rust with solar sails.
344 Battleships

The volume of raw minerals equals around 48,800,000 m3 (140 Jump Freighters or 55 Freighters) of hauling if you were to bring them in uncompressed. Even given perfect jump skills, this would eat up 2.1 B worth of Isotopes using the jump path I took to my production system, effectively killing your profits.
If bringing in the minerals is a Herculean task, what about bringing in the built ships?
Built ships have a better compression ratio. 344 Maelstroms, if hauled in from Empire to Nullsec, comes out to 17,200,000 m3 (49 Jump Freighters or 20 Freighters). Moving built hulls would bring fuel costs down to 764 M, but you can still do better.
1,000 425 Railgun I’s
Taking minerals in empire, compressing them into modules, and refining in nullsec is the best way to transport large quantities. 1,000 425 Railgun I’s equal 10,000 m3 of space yet produces around 1,407,000 m3 when refined (!).
This screenshot shows what you can achieve in a station with a 50% base refine and high refine skills. You could even push the yield to perfect by getting better standings (details and math here) with the station corporation.

Using only 425 Railgun I’s will leave you with a disproportional lack of Tritanium for battleship builds. Other items, such as the Passive Targeter I, can be used to balance out your needs.
