Eve Development Environment
Posted: 2014-03-14 Filed under: eveonline, market | Tags: heidisql, mysql, ubuntu 5 CommentsOverview
The following guide covers details on how to setup your own Eve Development Environment on your local machine. Using these directions you can create a master Virual Machine template, import the Eve Static Data set into a MySQL database, and query it with a database management program.
I plan on having further guides on running other pieces of software. I want to write guides for Lockefox’s Eve-Prosper tools and the once active Wallet Manager program that I have blogged about; once I learn how to create a public repository on GitHub, I will have a guide on how to run it from a template VM as outlined in this guide.
Virtual Box Setup
Rather than install server services on your local machine, we’re going to isolate them in a Virtual Machine that can be backed up and cloned into unique instances for our needs.
- Download and install Virtual Box here.
- Download Ubuntu Server ISO image here. Since we won’t be interfacing over the GUI, we can lessen the resource consumption of the VM by going with the Server edition.
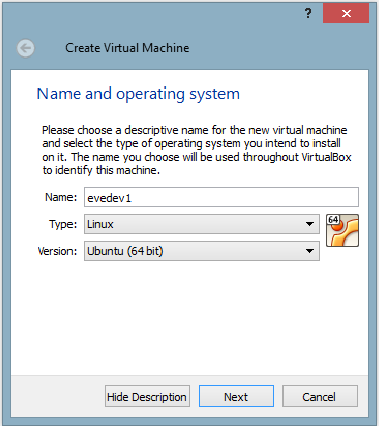
- Create a new Virtual machine named evedev1

- Select 512 or 1,024 MB of RAM depending on how much you have on your desktop and how quickly you want your Development machine to run. The more RAM the better, but with the Eve static data set coming it at 525 MB, you will reach a diminishing return after the majority of the data gets into RAM. You can always adjust this setting by powering off the VM if you find performance to be problematic.
- Create a virtual hard drive now.
- I’m partial to the VMDK format given my VMware background.
- Select Dynamically allocated as not to claim empty space on your machine.
- Specify 8 GB of storage to start or more depending on how much free space you have available. The base server install will take around 1.2 GB.
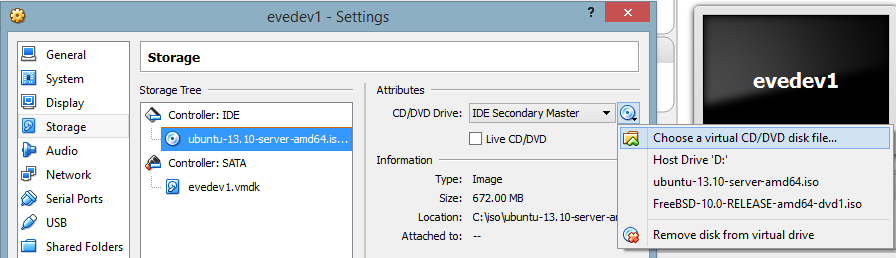
- Go to Settings on the evedev1 machine and Chose a virtual CD/DVD disk file. Select the Ubuntu Server ISO that you previously downloaded.

- Start the VM.
Ubuntu Server OS Setup
I prefer Ubuntu but you may want to use any number of Linux distributions.
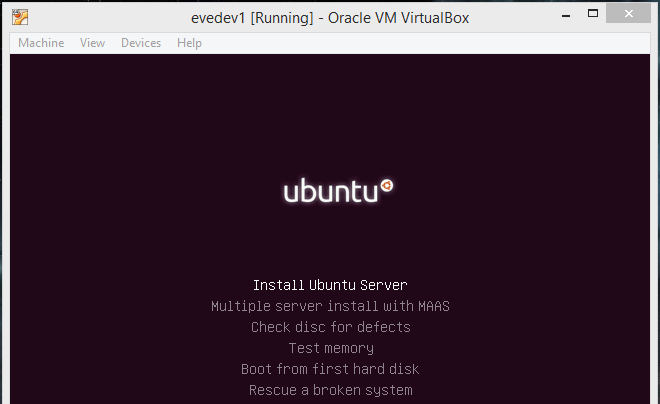
- If your ISO is mounted correctly, you will be presented with a Ubuntu boot screen.

- Select Install Ubuntu Server.
- Select your language, location, and keyboard mappings.
- Name the machine evedev1
- Create a evedev user.
- Create a password for the evedev user.
- Under partition disks select Guided – use entire disk. Since this is a Development VM, we will most likely not be using LVM.
- Select the partition and on the next screen write the changes.
- Allow apt to run to update packages.
- Select Install security updates automatically.
- Only select the OpenSSH server for now as we will be installing the database separately.
- Install the GRUB boot loader.
- After the installer finishes, reboot the VM.
- If everything is setup correctly, you should see a login prompt.
Creating a Template VM Image
This process gets us to a point where we have a base OS with patches installed. If we make any steps we can revert back to this image and also use this to spin off future copies of VM instances.
- Login as evedev with the password set during the install.
- Update local package database index with sudo apt-get update
- Update local packages with sudo apt-get upgrade. This process will take a while depending on the speed of your machine.
- Shut down the VM with sudo shutdown -h now
- If you want to make a backup of this file, do it now. We will consider this our Template VM image for making future clones.
Database Setup on a New Clone
- Create a Clone of evedev1 by right-clicking on the evedev1 machine and selecting Clone
- Name this clone evedev1-mysql and select Reinitialize the MAC address of all network cards.
- Select Full Clone.
- Power on the evedev1-mysql instance.
- Log in and check the IP address of the machine by using ifconfig.
- SSH into the IP address of your VM using PuTTY. I find that using PuTTY is more efficient than the Virtual Box interface since we will be pasting a long URL and will enable us to remotely access the database later.
- Install MySQL with sudo apt-get install mysql-server
- Set the mysql root user password.
- Find the latest MySQL conversion of the Eve Static Data at https://www.fuzzwork.co.uk/dump/.
- Copy the link of the latest conversion to your clipboard and download it with wget https://www.fuzzwork.co.uk/dump/mysql56-example.tbz2
- Uncompress the file with bunzip2 mysql56-example
- Un-tar the file with tar -xvf mysql56-example
- Change directory with cd rubicon-1.3-95173
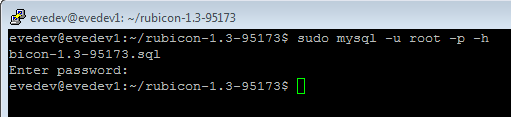
- Enter the MySQL Monitor with sudo mysql -u root -p
- Create a new empty database with create database rubicon95173;
- Exit with exit;
- Import the extracted .sql with sudo mysql -u root -p -h localhost rubicon95173 < mysql56-rubicon-1.3-95173.sql
- Wait for the import process to complete. The import took around 6 minutes on my laptop.
Remote Database Management
I prefer HeidiSQL to access the database, store queries, and edit table structures.
- Download and install HeidiSQL.
- Create a new Session and fill in the details for your VM. The details on the Settings tab will be the MySQL root user credentials for Hostname 127.0.0.1.
- Under the SSH tunnel tab, specify the location of your PuTTY executable. The SSH host + port will be the IP address of your VM such as 192.168.0.20 on port 22. The credentials on this tab will be for the evedev account.
- If successful, you should see our imported database and tables.


Running Queries
I wrote a guide on the basics of the Eve Static Dataset and some sample queries here.
Relocating Capital Building Operations
Posted: 2013-12-18 Filed under: industry, market, nullsec, ships | Tags: archon, chimera, delve, fountain, G-TT5V, moros, naglfar, nidhoggur, revelation, thanatos Leave a commentWith the stabilization of the Fountain and Delve regions over the past few months, the amount of sales we have seen in our building system have decreased. Raath made a command decision to leave the region in search for greener pastures.

Operation Performance
Our time in G-TT5V spanned 385 days where we built 162 capital hulls to sell on the local market. Our sales totaled 221.4 B ISK with a total profit coming in at 43.3 B. Performance metrics show a margin of 4.1%, an average of 3.4 B per month in profit, and a velocity of 5.06 hulls moved per week.
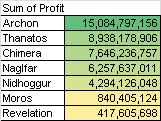
Top Performers
Given the balance changes to the Naglfar hull that came in the Odyssey update, we have seen a very strong demand the the hull; it is not a surprise that it has been a top performer. If you want to mass build, pick the Archon or Thanatos.

Capital Hull Profit Margins Trends
Posted: 2013-12-06 Filed under: industry, market, ships | Tags: archon, chimera, moros, naglfar, nidhoggur, revelation, thanatos Leave a commentAfter two months of Eve downtime to move across the country to start a new job, I wanted to report on how Capital sales have been performing as Raath has been leading the construction of capitals hulls in my absence.
Carrier Hulls
Looking at sales from 2012-06 to 2013-11, we are faced with shrinking margins on Carriers. With 139 data points covering over a year of sales, I think it is fairly easy to justify a trend from the data. The highest demand we saw was when TEST was defending Fountain, as the Slowcat doctrine was a training goal for a lot of pilots.

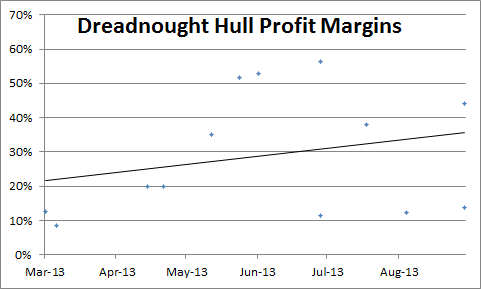
Dreadnought Hulls
We have a much smaller dataset to work with for Dreadnoughts as the BPOs and workflow for incorporating them into the production line was a fairly recent addition. With only six months of sales data, it is hard to draw a strong conclusion but the margins look to be holding stronger than Carriers. I attribute a lot of our strong numbers holding Dreadnoughts up primarily due to the Naglfar rebalance in the Odyssey expansion; their profit margins are holding up around 40% on average due to demand, and plus it is cool vertical hull.
Note: we are not building the Phoenix hull due to general terribleness.
Jump Freighter Kill Statistics
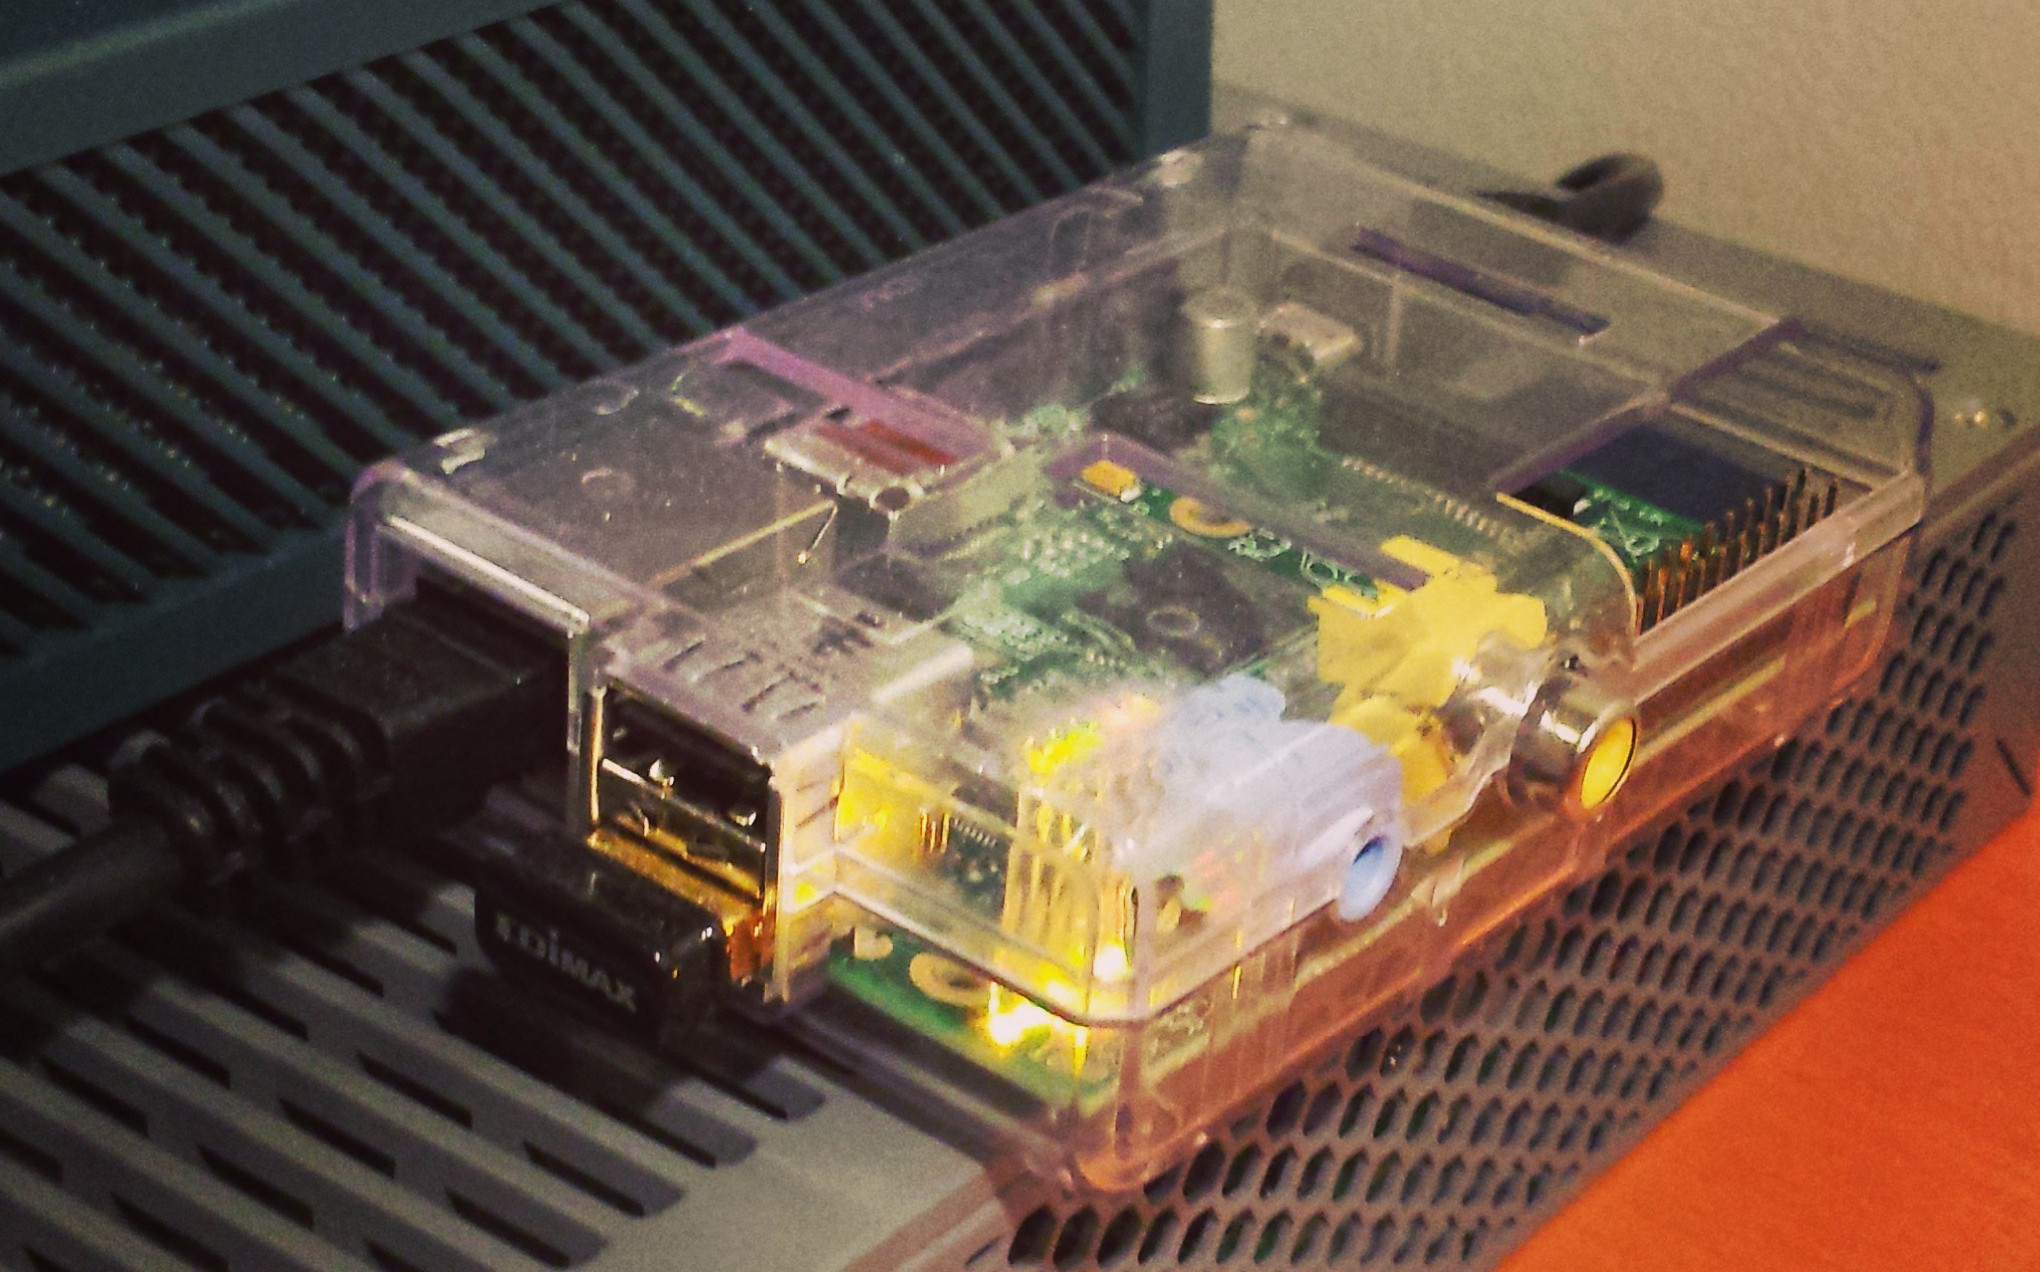
Posted: 2013-12-04 Filed under: eveonline, industry, market | Tags: anshar, ark, nomad, purjola, rhea, sagain 4 CommentsI’ve been working with @Lockefox over the past few days to setup his Eve-Prosper zKillboard scraper on my Raspberry Pi LAMP instance that I have in my home lab in order to do some data analysis.
Let there be Database Rows
The only edits that I had to make to the project code were the database connection details in scraper.ini and a narrowing down of ship classes listed in toaster_shiplist.json. After getting the data into mySQL and importing the invTypes and mapSolarSystems tables from the static dump into my database, I could start to filter and sort the results.
Kicking off the scraper:
pi@charon ~/eve_prosper $ python zkb_scraper.py — startdate=2013-12-01DB Connection: GOODzKillboard connection: GOODno crash log found. Executing as normal…Parsed Capital Industrial Ship: [200, 29713239, 0, ‘2013-04-08’] sleep=20.0Parsed Capital Industrial Ship: [290, 27468307, 1, ‘2012-12-30’] sleep=20.0
Here is the query to get Racial JFs and also include the solar system name and security value:
— Get Racial JFs
SELECT destruction_data.date, destruction_data.week, destruction_data.typeID, destruction_data.systemID, destruction_data.destroyed, invTypes.typeName, mapSolarSystems.solarSystemName, mapSolarSystems.security
FROM destruction_data
JOIN invTypes
ON (destruction_data.typeID = invTypes.typeID)
JOIN mapSolarSystems
ON (destruction_data.systemID = mapSolarSystems.solarsystemID)
WHERE destruction_data.typeID IN (28850, 28844, 28848, 28846)
ORDER BY destruction_data.date DESC
Results
Out of 975 Jump Freighter kills covering 334 days, there is an average of 20 a week killed. It turns out that you are most likely to get caught in Lowsec in a Rhea.
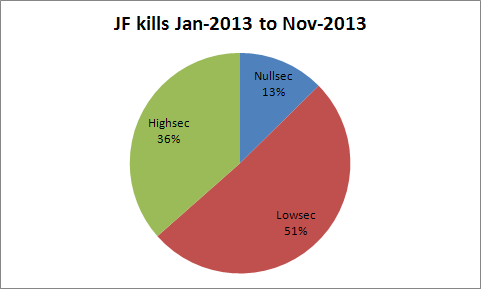

When we look at kills by system, Purjola (0.5), a Highsec system in the Forge stands out as the system with the most losses at 54. Not surprisingly the Lowsec system of Sagain (0.4) comes in second, most likely due to the terrible kickout station that I have covered here.

More coming soon as I start to think of what types of statistics and trends I can pull out of the data. If you have something you would like me to look at, please leave a comment or tweet @K162space.
Trading 204: Cross-Selling
Posted: 2013-08-30 Filed under: market, ships | Tags: loki, tech 3, tengu 3 CommentsModular Possibilities
A Tech 3 ship is a great example of an item that has high cross-selling opportunities. A Tech 3 hull by itself it useless; a person must assemble it by combining it with five Subsystem components –defensive, electronic, engineering, offensive, and propulsion. This requirement for flying the ship gives a trader the ability to also stock the necessary Subsystems and increase potential profits.
Tengu Hull Performance
I have found the Tengu hull to have the most volume out of the four racial Tech 3 hulls due to it’s PVP and PVE applications. The Loki hull is a close second, but it out-shined by the demand of the Tengu.
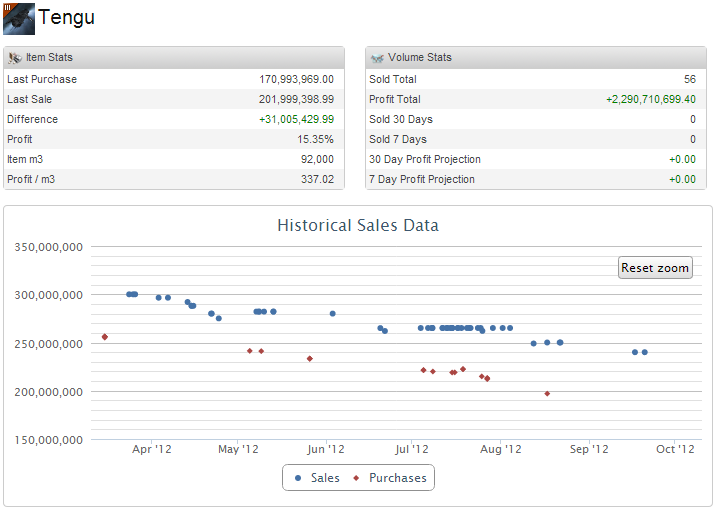
Over 473 days of trading I’ve sold 56 Tengu hulls. Moving 14.7 B ISK, I was able to achieve a 2.29 B total profit with the average profit per hull coming in at 41.65 M.
Tengu Subsystem Performance
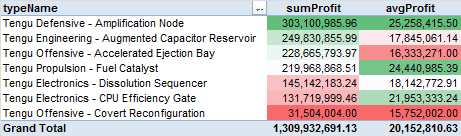
The real trading power comes from using some intelligence and trending to find the most popular Subsystems. My analysis shows that the Amplification Node was the most profitable and also had the highest average profit. The Fuel Catalyst is also a strong performer as it had the second highest average profit. At the bottom of the list was the Covert Reconfiguration as I accredit the cloakey role to be a very niche role.
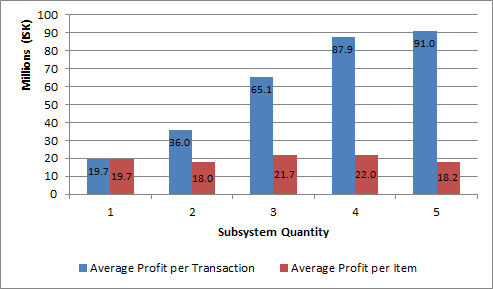
Cross-selling Performance
25 of the Tengu hull sales included the same client buying one or more Subsystems at or around the same time. On average a person bought 2.6 Subsystems with an average total of 52.4 M profit.
Further analysis shows that the best performance comes from also selling a person 3-4 Subsystems when they are also buying the Tengu hull as the average profit per Subsystem for these transactions types comes in at 21.7-22 M.